AWS Misc
API security
Source 1
In the meantime, when trying to secure your serverless applications, we recommend the following checklist and addressing these questions to start:
- Enumerate your serverless apps and entry points – Do you have a way to identify all of the new serverless apps being created in your Amazon, Azure, and Google cloud environments? Is this a continuous process or do you have staff doing manual steps for discovery? Are there tools/scripts you can use to help automate? Can you figure out the entry/input points that trigger underlying services, often via API calls?
- API definition and specification – Do you have an API definition of what your serverless apps can do? Does it meet a standard specification such as Swagger or OpenAPI v3? If not, can you create an API definition through an audit? Does your serverless app connect to an API gateway to help outline what it can do?
- Authentication and encryption – How does your serverless application verify identity? OAuth has become a de-facto standard in many organizations but making that work seamlessly with all of the API interfaces can be prone to misconfiguration. Also, is SSL encryption enabled? What versions of TLS are employed? How are encryption keys and app secrets handled and stored? Again, these basic security controls tend to be common areas where attackers take advantage of poor AppSec hygiene.
- Consumers, receivers, and clients – Can you list all of the client-side API consumers/receivers for your serverless applications, e.g. mobile apps, modern web front-ends, chatbots, IoT backends? Are there consumers you don’t expect to be accessing your serverless apps through their APIs? Are there tools you can use to help identify these various consumers of your serverless apps?
- Data sources – Is source code access part of your CI/CD environment? Can you ensure it falls within your automated SDLC audit and security assessment? Can you identify the types of data sources your serverless apps have access to? The source code is often a starting point to map out what data sources the serverless app is attempting to connect with.
- Error handling – Do you have an automated way to parse and analyze the logs coming from your serverless applications? Many security and compliance problems can be identified through critical alerts and error messages stored in logs from these serverless apps.
Source 2
Here are some of the most common ways you can strengthen your API security:
- Use tokens. Establish trusted identities and then control access to services and resources by using tokens assigned to those identities.
- Use encryption and signatures. Encrypt your data using a method like TLS(see above). Require signatures to ensure that the right users are decrypting and modifying your data, and no one else.
- Identify vulnerabilities. Keep up with your operating system, network, drivers, and API components. Know how everything works together and identify weak spots that could be used to break into your APIs. Use sniffers to detect security issues and track data leaks.
- Use quotas and throttling. Place quotas on how often your API can be called and track its use over history. More calls on an API may indicate that it is being abused. It could also be a programming mistake such as calling the API in an endless loop. Make rules for throttling to protect your APIs from spikes and Denial-of-Service attacks.
- Use an API gateway. API gateways act as the major point of enforcement for API traffic. A good gateway will allow you to authenticate traffic as well as control and analyze how your APIs are used.
API management and security
Finally, API security often comes down to good API management. Many API management platforms support three types of security schemes. These are:
- An API key that is a single token string (i.e. a small hardware device that provides unique authentication information).
- Basic Authentication (APP ID / APP Key) that is a two token string solution (i.e. username and password).
- OpenID Connect (OIDC) that is a simple identity layer on top of the popular OAuth framework (i.e. it verifies the user by obtaining basic profile information and using an authentication server).
Authentication vs Authorization
- Authentication: Refers to proving correct identity
- Authorization: Refers to allowing a certain action

2FA
双因素认证 (Two-factor authentication)
一般来说,三种不同类型的证据,可以证明一个人的身份:
- 秘密信息:只有该用户知道、其他人不知道的某种信息,比如密码。
- 个人物品:该用户的私人物品,比如身份证、钥匙。
- 生理特征:该用户的遗传特征,比如指纹、相貌、虹膜等等。
这些证据就称为三种”因素”(factor). 因素越多,证明力就越强,身份就越可靠. 双因素认证就是指,通过认证同时需要两个因素的证据.
方案:
- Security Device (device / mobile phone)
- SMS
- TOTP (Time-based One-time Password)
- 公认的可靠解决方案,已经写入国际标准 RFC6238
- 步骤:
- 用户开启双因素认证后,服务器生成一个密钥
- 服务器提示用户扫描二维码(或者使用其他方式), 把密钥保存到用户的手机. 也就是说,服务器和用户的手机,现在都有了同一把密钥
- 密钥必须跟手机绑定. 一旦用户更换手机,就必须生成全新的密钥.
- 用户登录时,手机客户端使用这个密钥和当前时间戳,生成一个哈希,有效期默认为30秒. 用户在有效期内,把这个哈希提交给服务器
- 服务器也使用密钥和当前时间戳,生成一个哈希,跟用户提交的哈希比对. 只要两者不一致,就拒绝登录
TOTP算法: 问题:手机客户端和服务器,如何保证30秒期间都得到同一个哈希呢?
答案:
TC = floor((unixtime(now) − unixtime(T0)) / TS)
上面的公式中,TC 表示一个时间计数器,unixtime(now)是当前 Unix 时间戳,unixtime(T0)是约定的起始时间点的时间戳,默认是0,也就是1970年1月1日. TS 则是哈希有效期的时间长度,默认是30秒. 因此,上面的公式就变成下面的形式.
TC = floor(unixtime(now) / 30)
所以,只要在 30 秒以内,TC 的值都是一样的. 前提是服务器和手机的时间必须同步.
然后就可以算出哈希了
TOTP = HASH(SecretKey, TC)
上面代码中,HASH就是约定的哈希函数,默认是 SHA-1.
TOTP 有硬件生成器和软件(Google Authenticator)生成器之分,都是采用上面的算法.
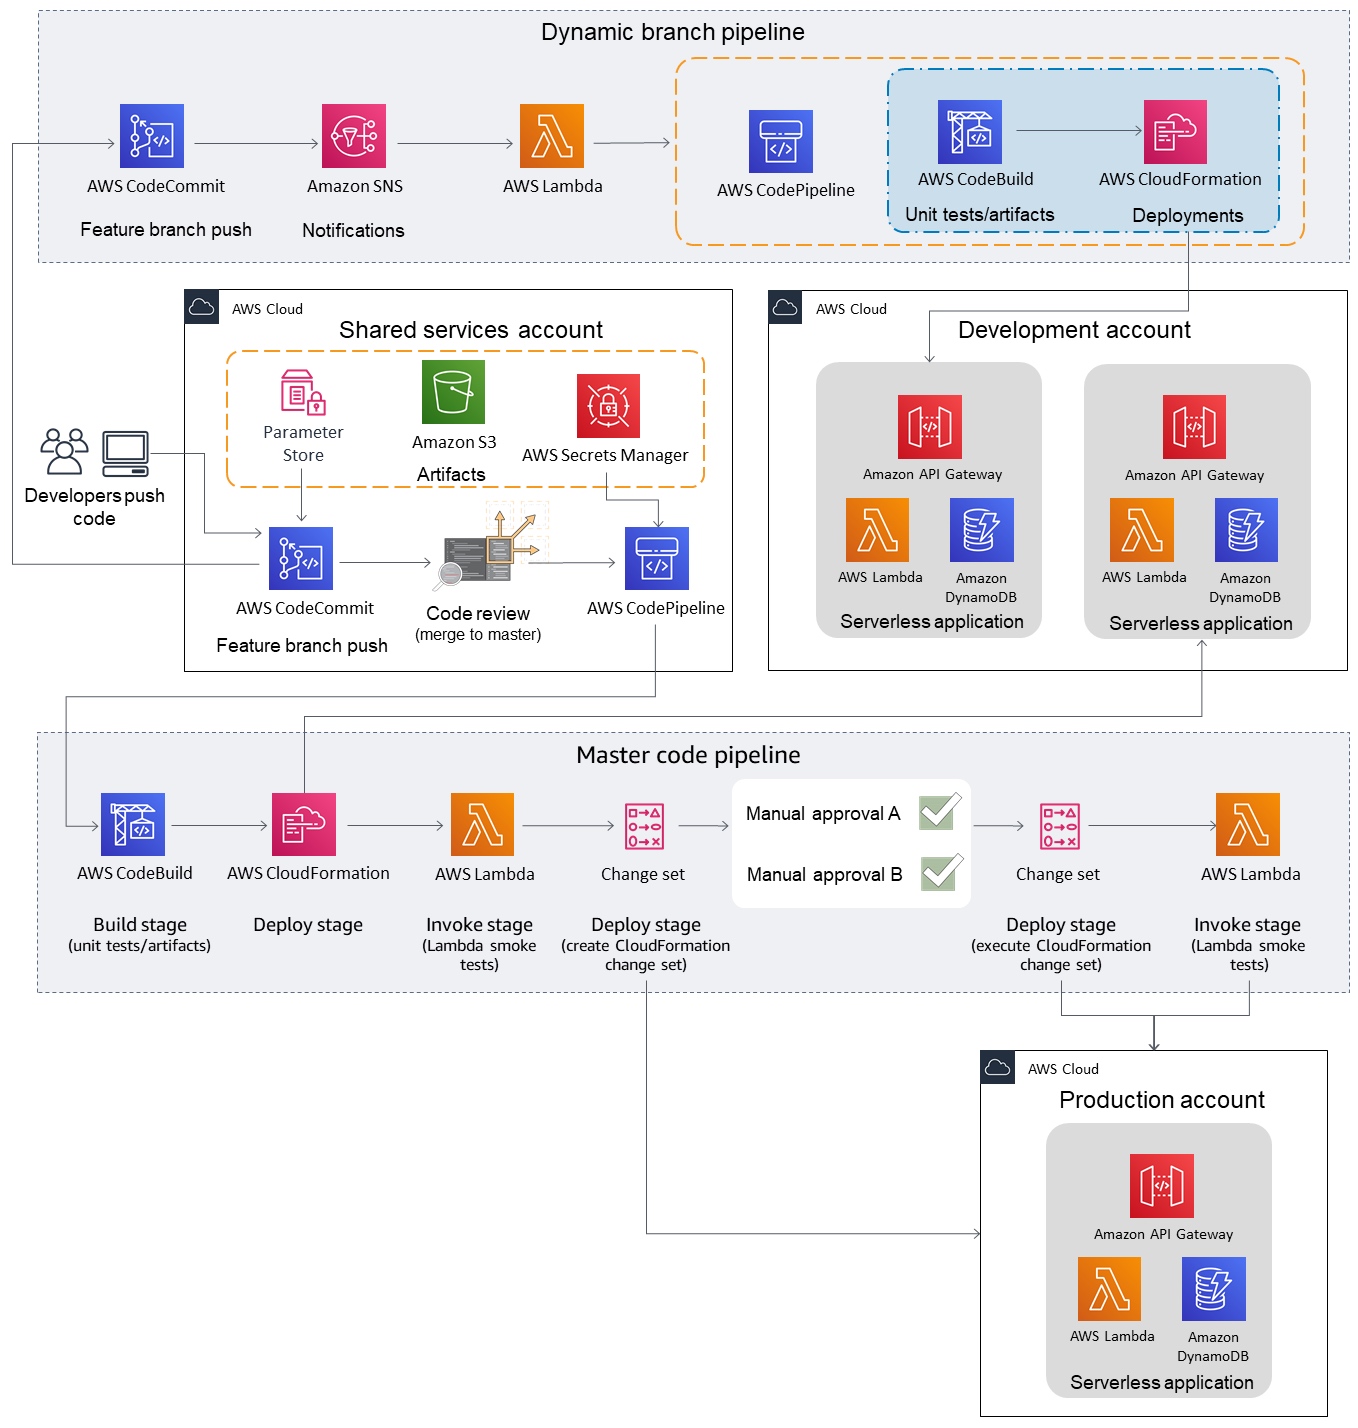
Serverless CICD
- https://lumigo.io/blog/advanced-serverless-cicd-part-1-aws-codebuild/
- https://serverlessfirst.com/serverless-cicd-pipelines-with-aws-cdk/
- https://www.serverless.com/blog/cicd-for-serverless-part-2
- https://www.serverless.com/blog/cicd-for-serverless-part-1
- https://www.serverless.com/learn/guides/cicd/
- https://www.serverless.com/cicd/
Serverless security
https://www.serverless.com/blog/fantastic-serverless-security-risks-and-where-to-find-them/
api key - to secure all API https://medium.com/@dorian599/serverless-api-keys-c0ee41528cc9
IAM control
https://www.serverless.com/blog/abcs-of-iam-permissions/
Flask API security
1. password hashing
2. token
3. oAuth
serverless HA
Availability out of box: The good thing about living in the serverless world is that you get availability out of the box. All services provide high availability capabilities and in most cases either autoscale or provide easy configuration to handle workloads. So technically, most of it is taken care.
With Serverless, you enjoy flexible scaling and automated high availability, but don’t have to bear the burden of server management and idle capacity.
In practical terms, Serverless means that you no longer need to:
- Pay for keeping up the servers that don’t serve any requests at the moment
- Maintain the servers, their uptime and resources
- Ensure server security and regular server updates
- Scale the servers up or down, based on usage
So, while the name is totally misleading, you don’t really have to keep the servers in mind when developing, updating, or supporting your software and applications. And this means fewer distractions, faster development time, and a considerable saving on resources that are dynamically allocated to run the code.
- No Server Management. You don’t have to worry about deploying and managing hosts. All server-related issues like OS configurations or runtime patching aren’t your concern.
- Flexible Scaling. The services scale up or down in response to the load, or based on the specified capacity of unit work. No longer you have to scale using such parameters as memory capacity or CPU cores. Instead, you specify the total amount of work that needs to be done.
- Automated High Availability & Fault Tolerance. An application’s deployments are distributed across multiple availability zones by default. Since a single point of failure is removed, your app becomes more fault tolerant.
- No Idle Capacity. You pay only for the total invocations of your function; plus, the time the function is running. If the function isn’t used, there won’t be any ongoing cost. Capacity management and elastic scaling aren’t your concerns now.
https://squadex.com/insights/what-is-serverless/amp/
https://www.scalyr.com/blog/serverless-architecture/
https://aws.amazon.com/cn/serverless/
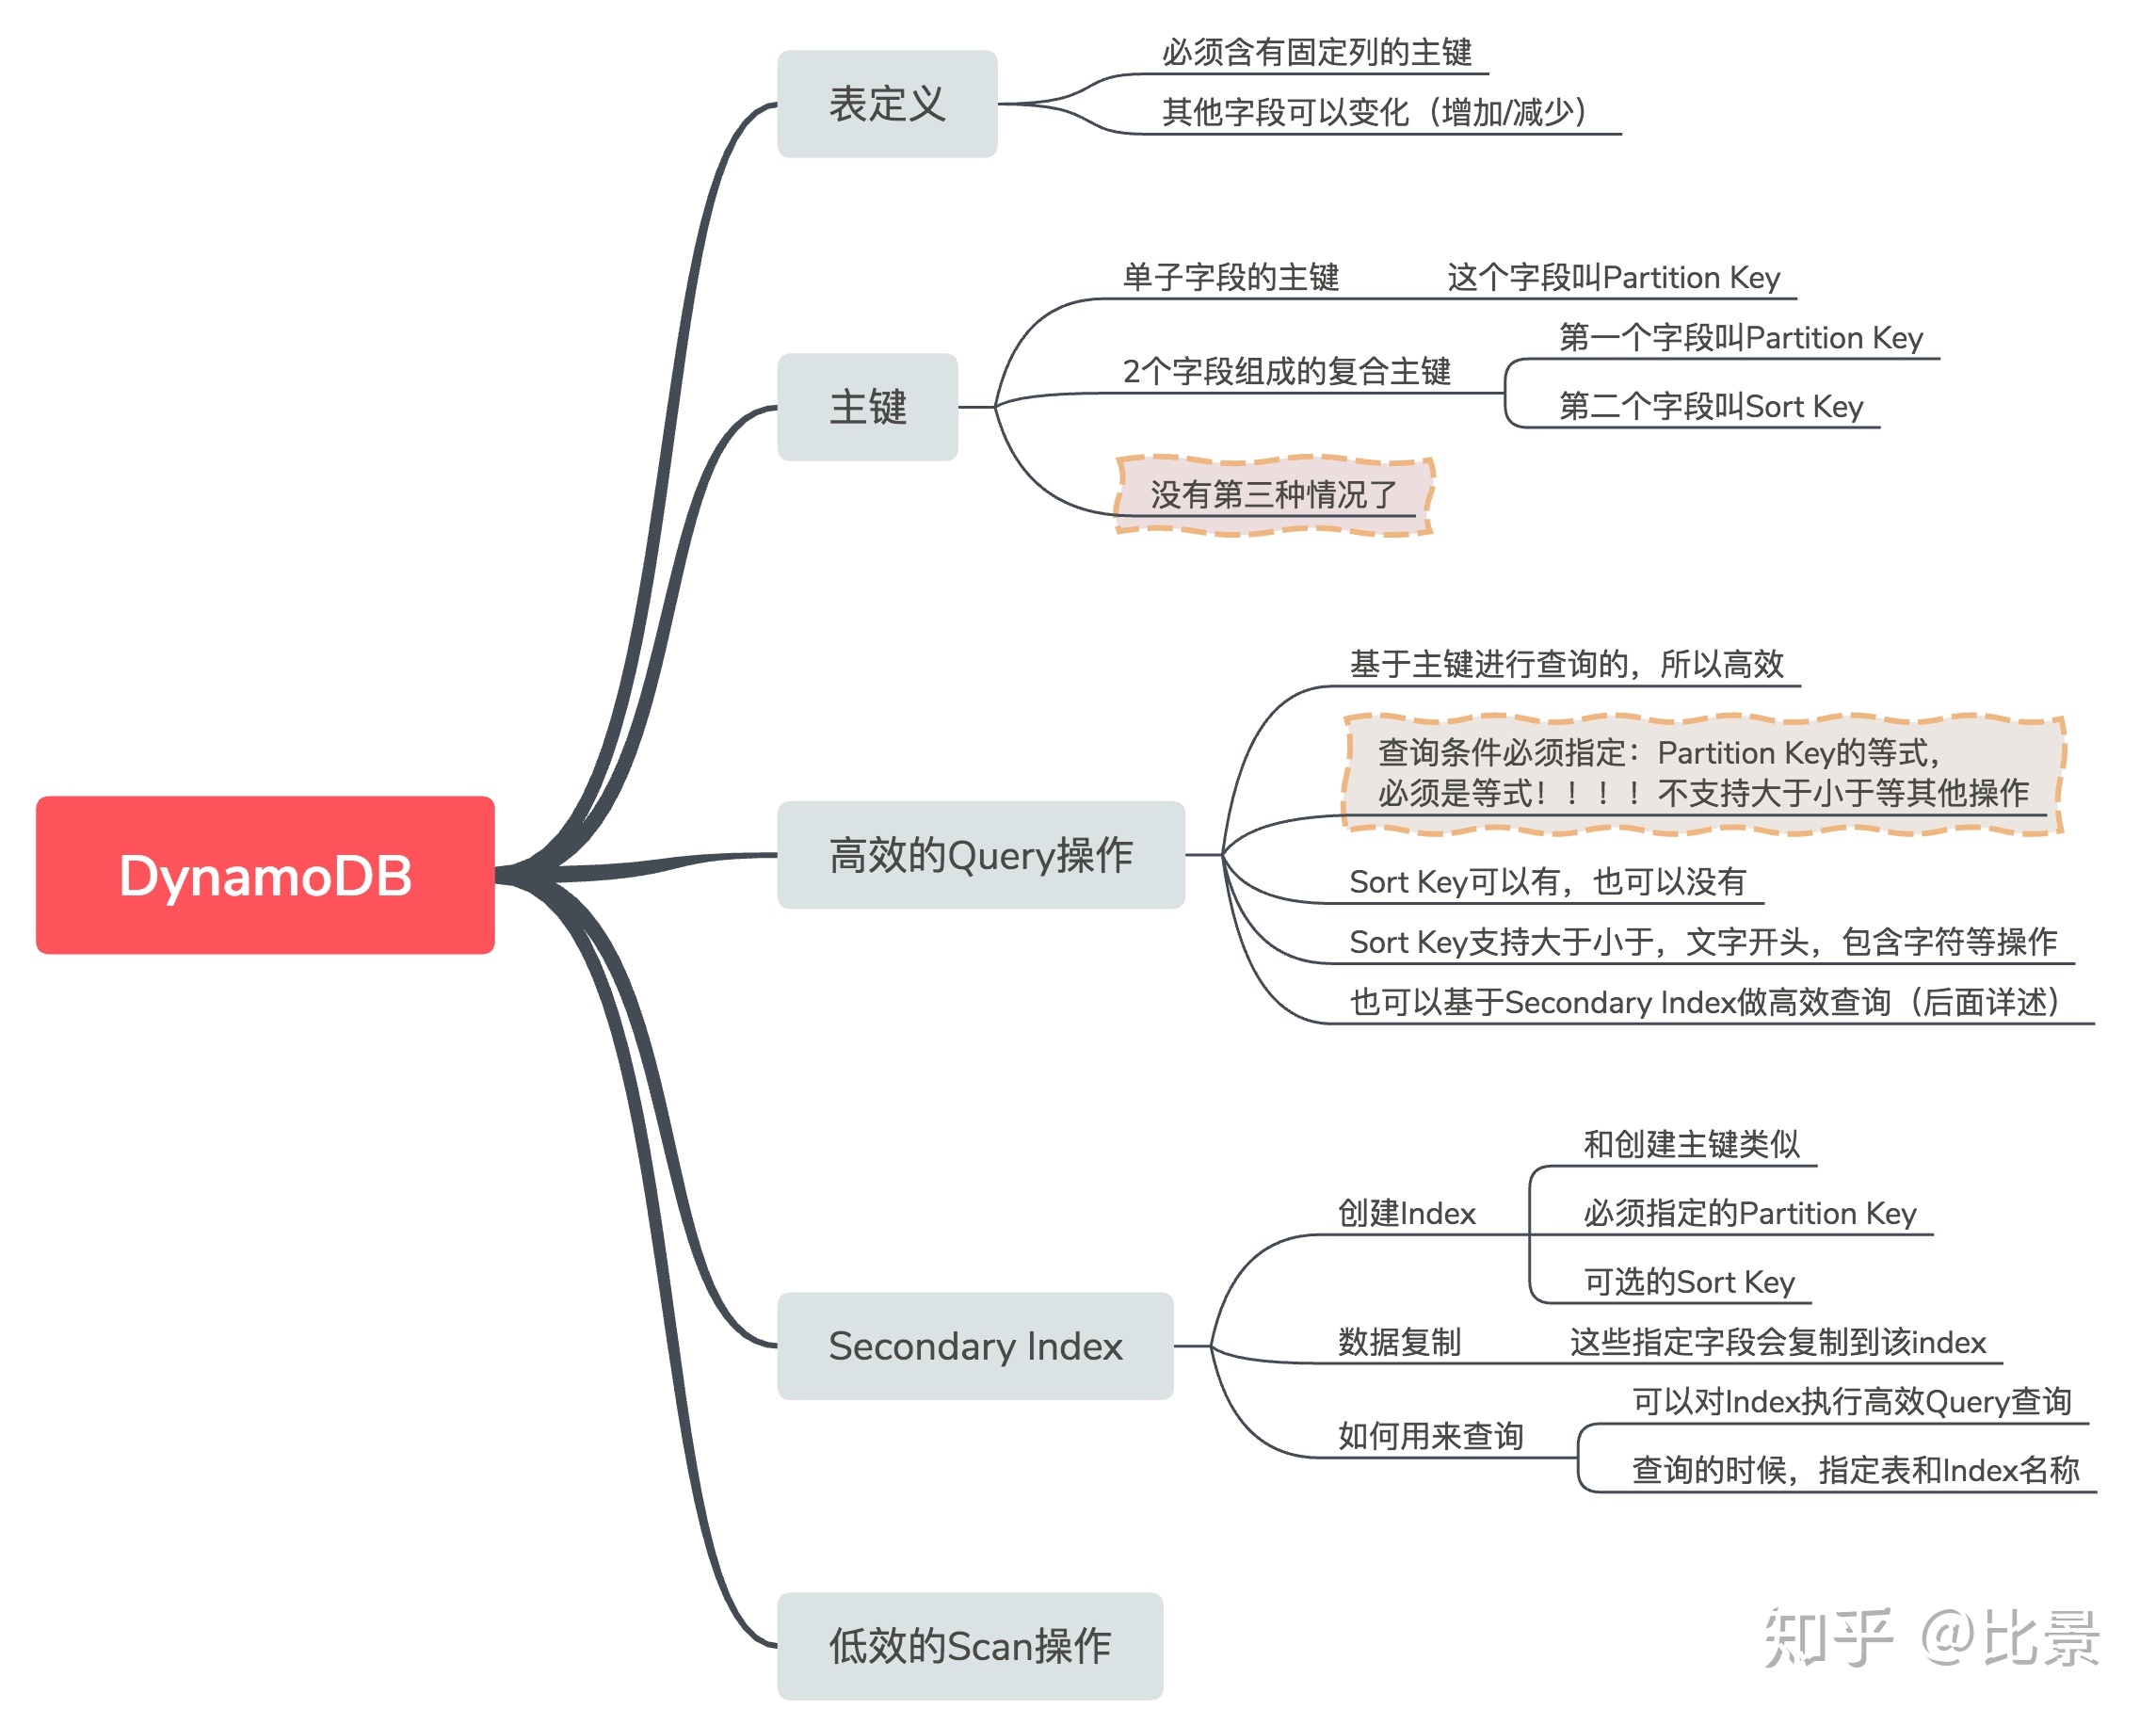
DynamoDB
Ref
- Python https://boto3.amazonaws.com/v1/documentation/api/latest/guide/dynamodb.html
- 可视化 https://github.com/YoyaTeam/dynamodb-manager
- https://aws.amazon.com/cn/blogs/database/using-sort-keys-to-organize-data-in-amazon-dynamodb/
- BP https://aws.amazon.com/cn/blogs/database/resolve-to-follow-amazon-dynamodb-best-practices-in-2019/
- 可视化 https://dynobase.dev/dynamodb-tutorials/#core
- 1toM https://www.alexdebrie.com/posts/dynamodb-one-to-many/
Using Sort Keys to Organize Data in Amazon DynamoDB: https://aws.amazon.com/cn/blogs/database/using-sort-keys-to-organize-data-in-amazon-dynamodb/
Some wrapper methods to deal with DynamoDB databases in Python, using boto3.
from boto3 import resource
from boto3.dynamodb.conditions import Key

# The boto3 dynamoDB resource
dynamodb_resource = resource('dynamodb')


def get_table_metadata(table_name):
    """
    Get some metadata about chosen table.
    """
    table = dynamodb_resource.Table(table_name)

    return {
        'num_items': table.item_count,
        'primary_key_name': table.key_schema[0],
        'status': table.table_status,
        'bytes_size': table.table_size_bytes,
        'global_secondary_indices': table.global_secondary_indexes
    }


def read_table_item(table_name, pk_name, pk_value):
    """
    Return item read by primary key.
    """
    table = dynamodb_resource.Table(table_name)
    response = table.get_item(Key={pk_name: pk_value})

    return response


def add_item(table_name, col_dict):
    """
    Add one item (row) to table. col_dict is a dictionary {col_name: value}.
    """
    table = dynamodb_resource.Table(table_name)
    response = table.put_item(Item=col_dict)

    return response


def delete_item(table_name, pk_name, pk_value):
    """
    Delete an item (row) in table from its primary key.
    """
    table = dynamodb_resource.Table(table_name)
    response = table.delete_item(Key={pk_name: pk_value})

    return


def scan_table_firstpage(table_name, filter_key=None, filter_value=None):
    """
    Perform a scan operation on table. Can specify filter_key (col name) and its value to be filtered. This gets only first page of results in pagination. Returns the response.
    """
    table = dynamodb_resource.Table(table_name)

    if filter_key and filter_value:
        filtering_exp = Key(filter_key).eq(filter_value)
        response = table.scan(FilterExpression=filtering_exp)
    else:
        response = table.scan()

    return response


def scan_table_allpages(table_name, filter_key=None, filter_value=None):
    """
    Perform a scan operation on table. Can specify filter_key (col name) and its value to be filtered. This gets all pages of results.
    Returns list of items.
    """
    table = dynamodb_resource.Table(table_name)

    if filter_key and filter_value:
        filtering_exp = Key(filter_key).eq(filter_value)
        response = table.scan(FilterExpression=filtering_exp)
    else:
        response = table.scan()

    items = response['Items']
    while True:
        print len(response['Items'])
        if response.get('LastEvaluatedKey'):
            response = table.scan(ExclusiveStartKey=response['LastEvaluatedKey'])
            items += response['Items']
        else:
            break

    return items


def query_table(table_name, filter_key=None, filter_value=None):
    """
    Perform a query operation on the table. Can specify filter_key (col name) and its value to be filtered. Returns the response.
    """
    table = dynamodb_resource.Table(table_name)

    if filter_key and filter_value:
        filtering_exp = Key(filter_key).eq(filter_value)
        response = table.query(KeyConditionExpression=filtering_exp)
    else:
        response = table.query()

    return response

def update_item(self, table_name, pk_name, pk_value, col_dict):
        """
        update one item (row) to table. col_dict is a dictionary {col_name: value}.
        """

        update_expression = 'SET {}'.format(','.join(f'#{k}=:{k}' for k in col_dict))
        expression_attribute_values = {f':{k}': v for k, v in col_dict.items()}
        expression_attribute_names = {f'#{k}': k for k in col_dict}

        table = dynamodb.Table(table_name)
        response = table.update_item(
            Key={'{}'.format(pk_name): pk_value},
            UpdateExpression=update_expression,
            ExpressionAttributeValues=expression_attribute_values,
            ExpressionAttributeNames=expression_attribute_names,
            ReturnValues='UPDATED_NEW',
        )

        return response
Dynamodb LSI/GSI (Global/Local secondary index):
- Local Secondary Indexes still rely on the original Hash Key. When you supply a table with hash+range, think about the LSI as hash+range1, hash+range2.. hash+range6. You get 5 more range attributes to query on. Also, there is only one provisioned throughput.
- Global Secondary Indexes defines a new paradigm - different hash/range keys per index. This breaks the original usage of one hash key per table. This is also why when defining GSI you are required to add a provisioned throughput per index and pay for it.
This is the name of the index, which is usually different from the name of the index attribute (the name of the index has an -index suffix by default, although you can change it during table creation). For example, if your index attribute is called video_id, your index name is probably video_id-index
import boto3
from boto3.dynamodb.conditions import Key
dynamodb = boto3.resource('dynamodb')
table = dynamodb.Table('videos')
video_id = 25
response = table.query(
    IndexName='video_id-index',
    KeyConditionExpression=Key('video_id').eq(video_id)
)
To check the index name, go to the Indexes tab of the table on the web interface of AWS. You’ll need a value from the Name column
For anyone using the boto3 client, below example should work:
import boto3

# for production
client = boto3.client('dynamodb')

# for local development if running local dynamodb server
client = boto3.client(
   'dynamodb',
   region_name='localhost',
   endpoint_url='http://localhost:8000'
)

resp = client.query(
   TableName='UsersTabe',
   IndexName='MySecondaryIndexName',
   ExpressionAttributeValues={
       ':v1': {
           'S': '[email protected]',
       },
   },
   KeyConditionExpression='emailField = :v1',
)

# will always return list
items = resp.get('Items')

first_item = items[0]
SNS & SQS
sns = Simple Notification Service; sqs = Simple Queue Service
SNS is a distributed publish-subscribe system. Messages are pushed to subscribers as and when they are sent by publishers to SNS. SNS supports several end points such as email, sms, http end point and SQS (deliver to many subscribers(fan out)). If you want unknown number and type of subscribers to receive messages, you need SNS.
SQS is distributed queuing system. Messages are NOT pushed to receivers. Receivers have to poll or pull messages from SQS. Messages can’t be received by multiple receivers at the same time. Any one receiver can receive a message, process and delete it. Other receivers do not receive the same message later. Polling inherently introduces some latency in message delivery in SQS unlike SNS where messages are immediately pushed to subscribers.
You don’t have to couple SNS and SQS always. You can have SNS send messages to email, sms or http end point apart from SQS. There are advantages to coupling SNS with SQS. You may not want an external service to make connections to your hosts (firewall may block all incoming connections to your host from outside). Your end point may just die because of heavy volume of messages. Email and SMS maybe not your choice of processing messages quickly. By coupling SNS with SQS, you can receive messages at your pace. It allows clients to be offline, tolerant to network and host failures. You also achieve guaranteed delivery. If you configure SNS to send messages to an http end point or email or SMS, several failures to send message may result in message being dropped.
SQS is mainly used to decouple applications or integrate applications. Messages can be stored in SQS for short duration of time (max 14 days). SNS distributes several copies of message to several subscribers. For example, lets say you want to replicate data generated by an application to several storage systems. You could use SNS and send this data to multiple subscribers, each replicating the messages it receives to different storage systems (s3, hard disk on your host, database, etc.).
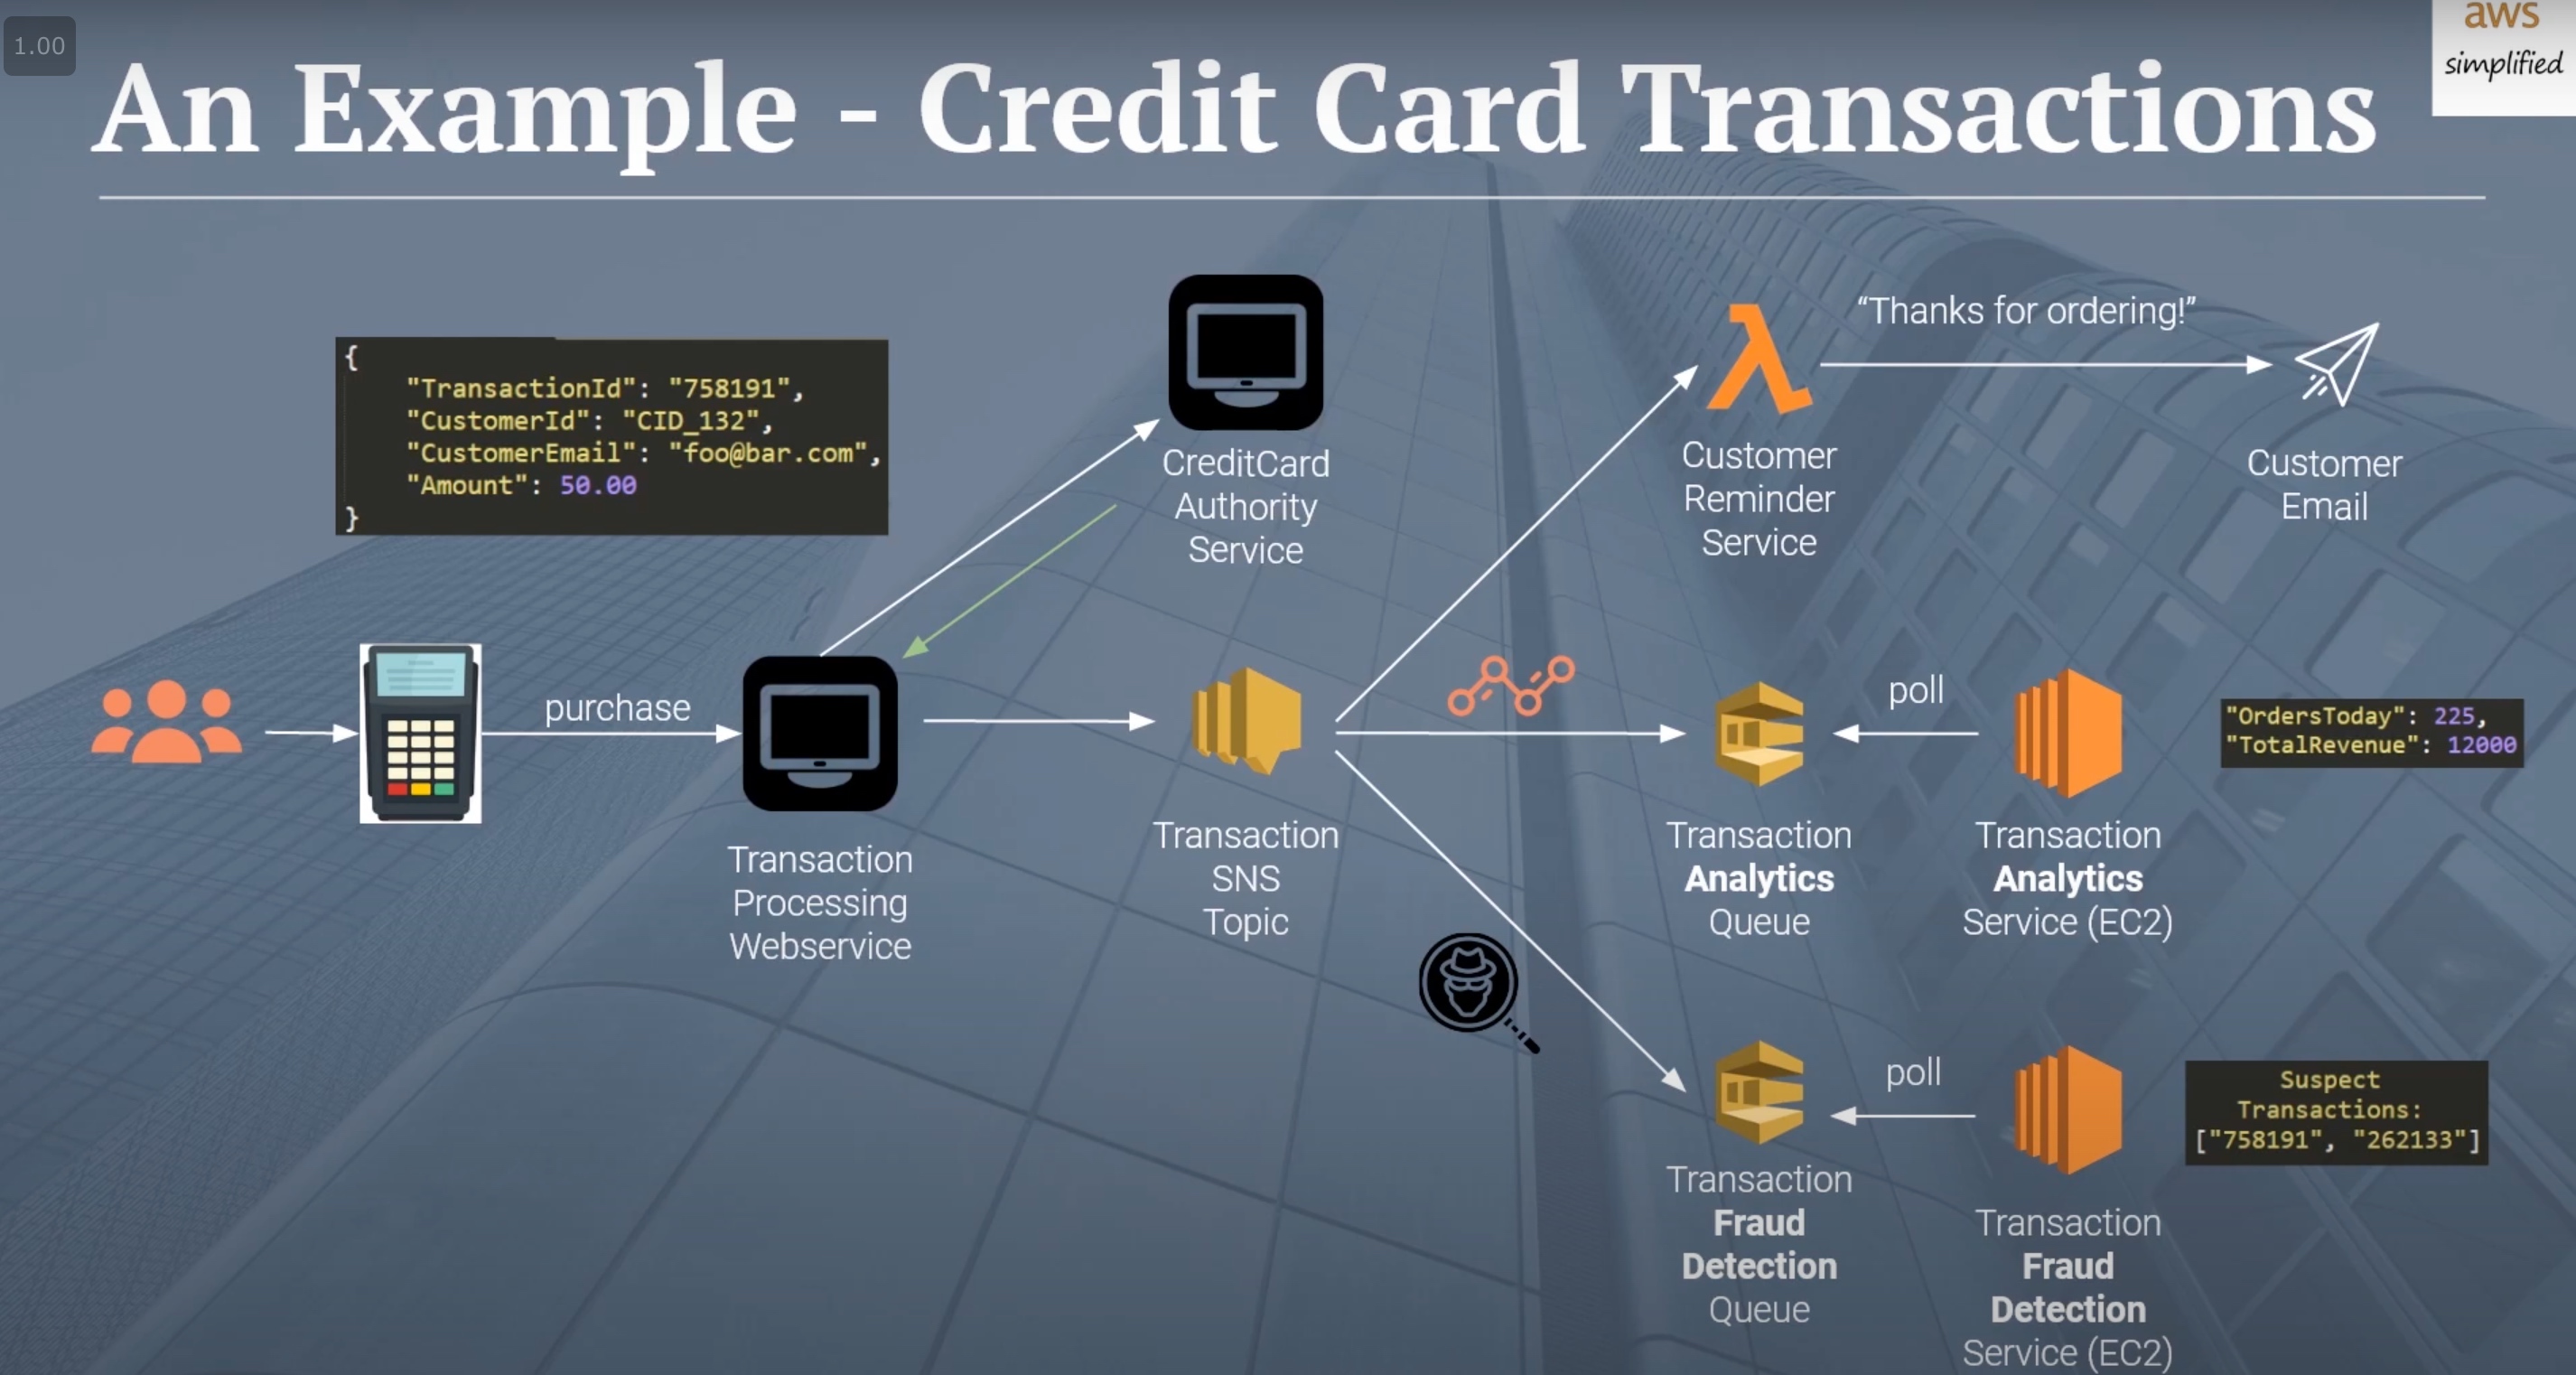
Why dun just put all the services into txn processing webservice(restAPI)?
- decoupling into several services helps avoid partial failure situation
- sns helps to deliver to diff independent consumers and make sure the msg gets processing
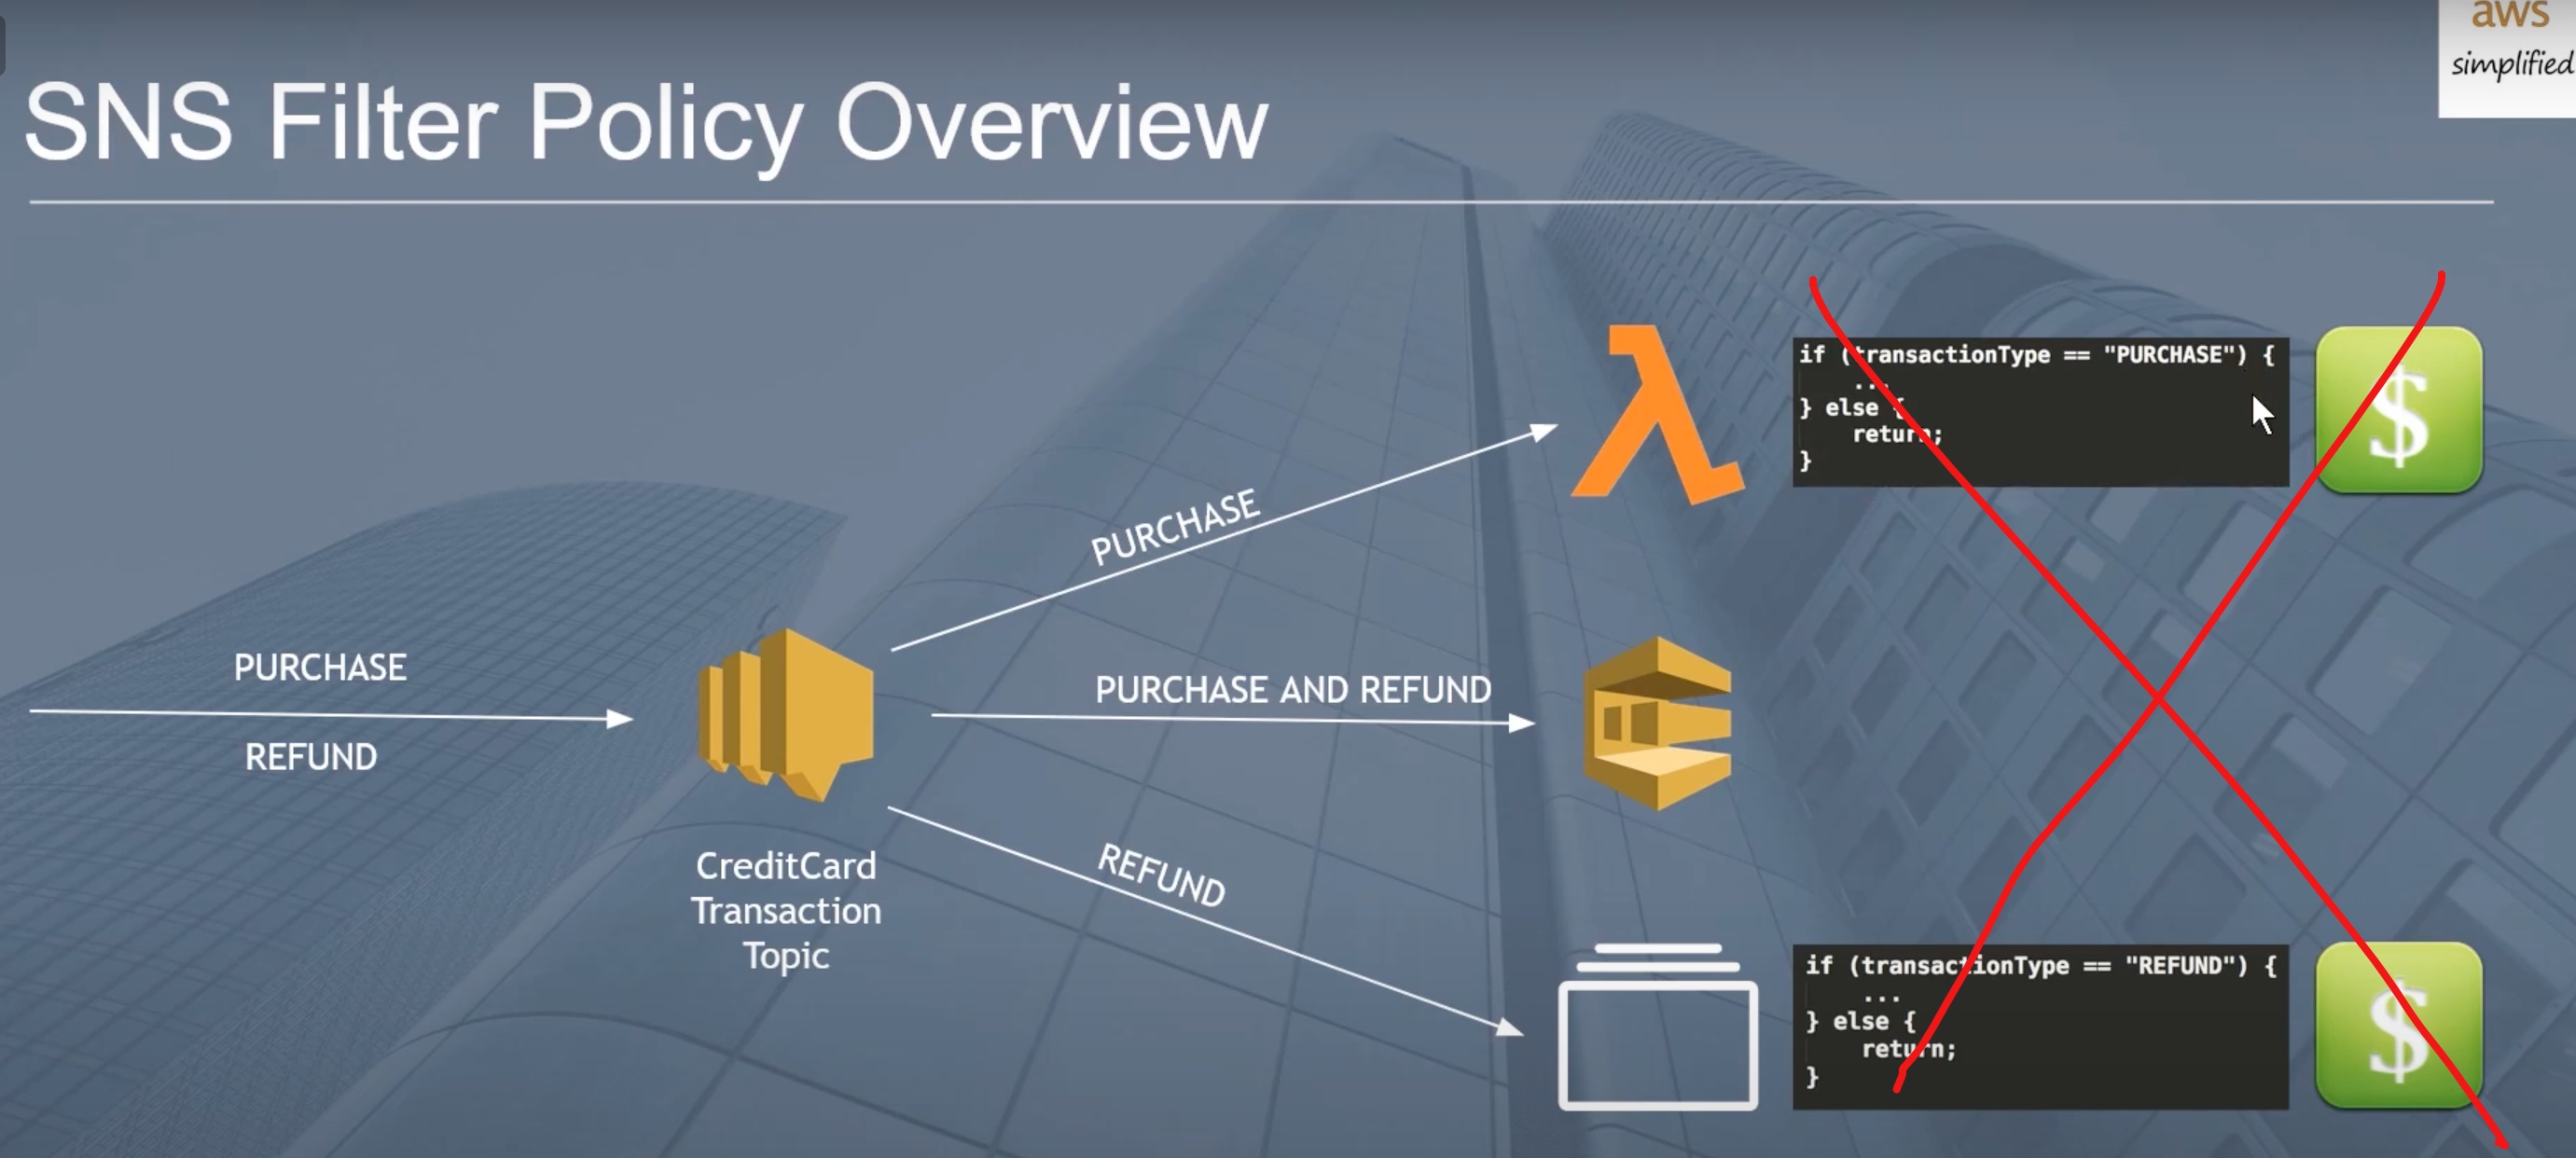
not all end points subscribe all the events.
- solu1: use if else. but every lambda function invocation causes money so not suggested
- solu2: associate the msg with a type
Websocket ans Serverless
Websockets make it possible to add support for a bi-directional communication channel between clients and servers. Connection channels are kept alive and are re-used to exchange messages back-and-forth.
Tutorial: Creating a real-time game with Websockets and Flutter (TicTacToe) - Could regard it as reference how to use websocket in Flutter (connect, set header….)
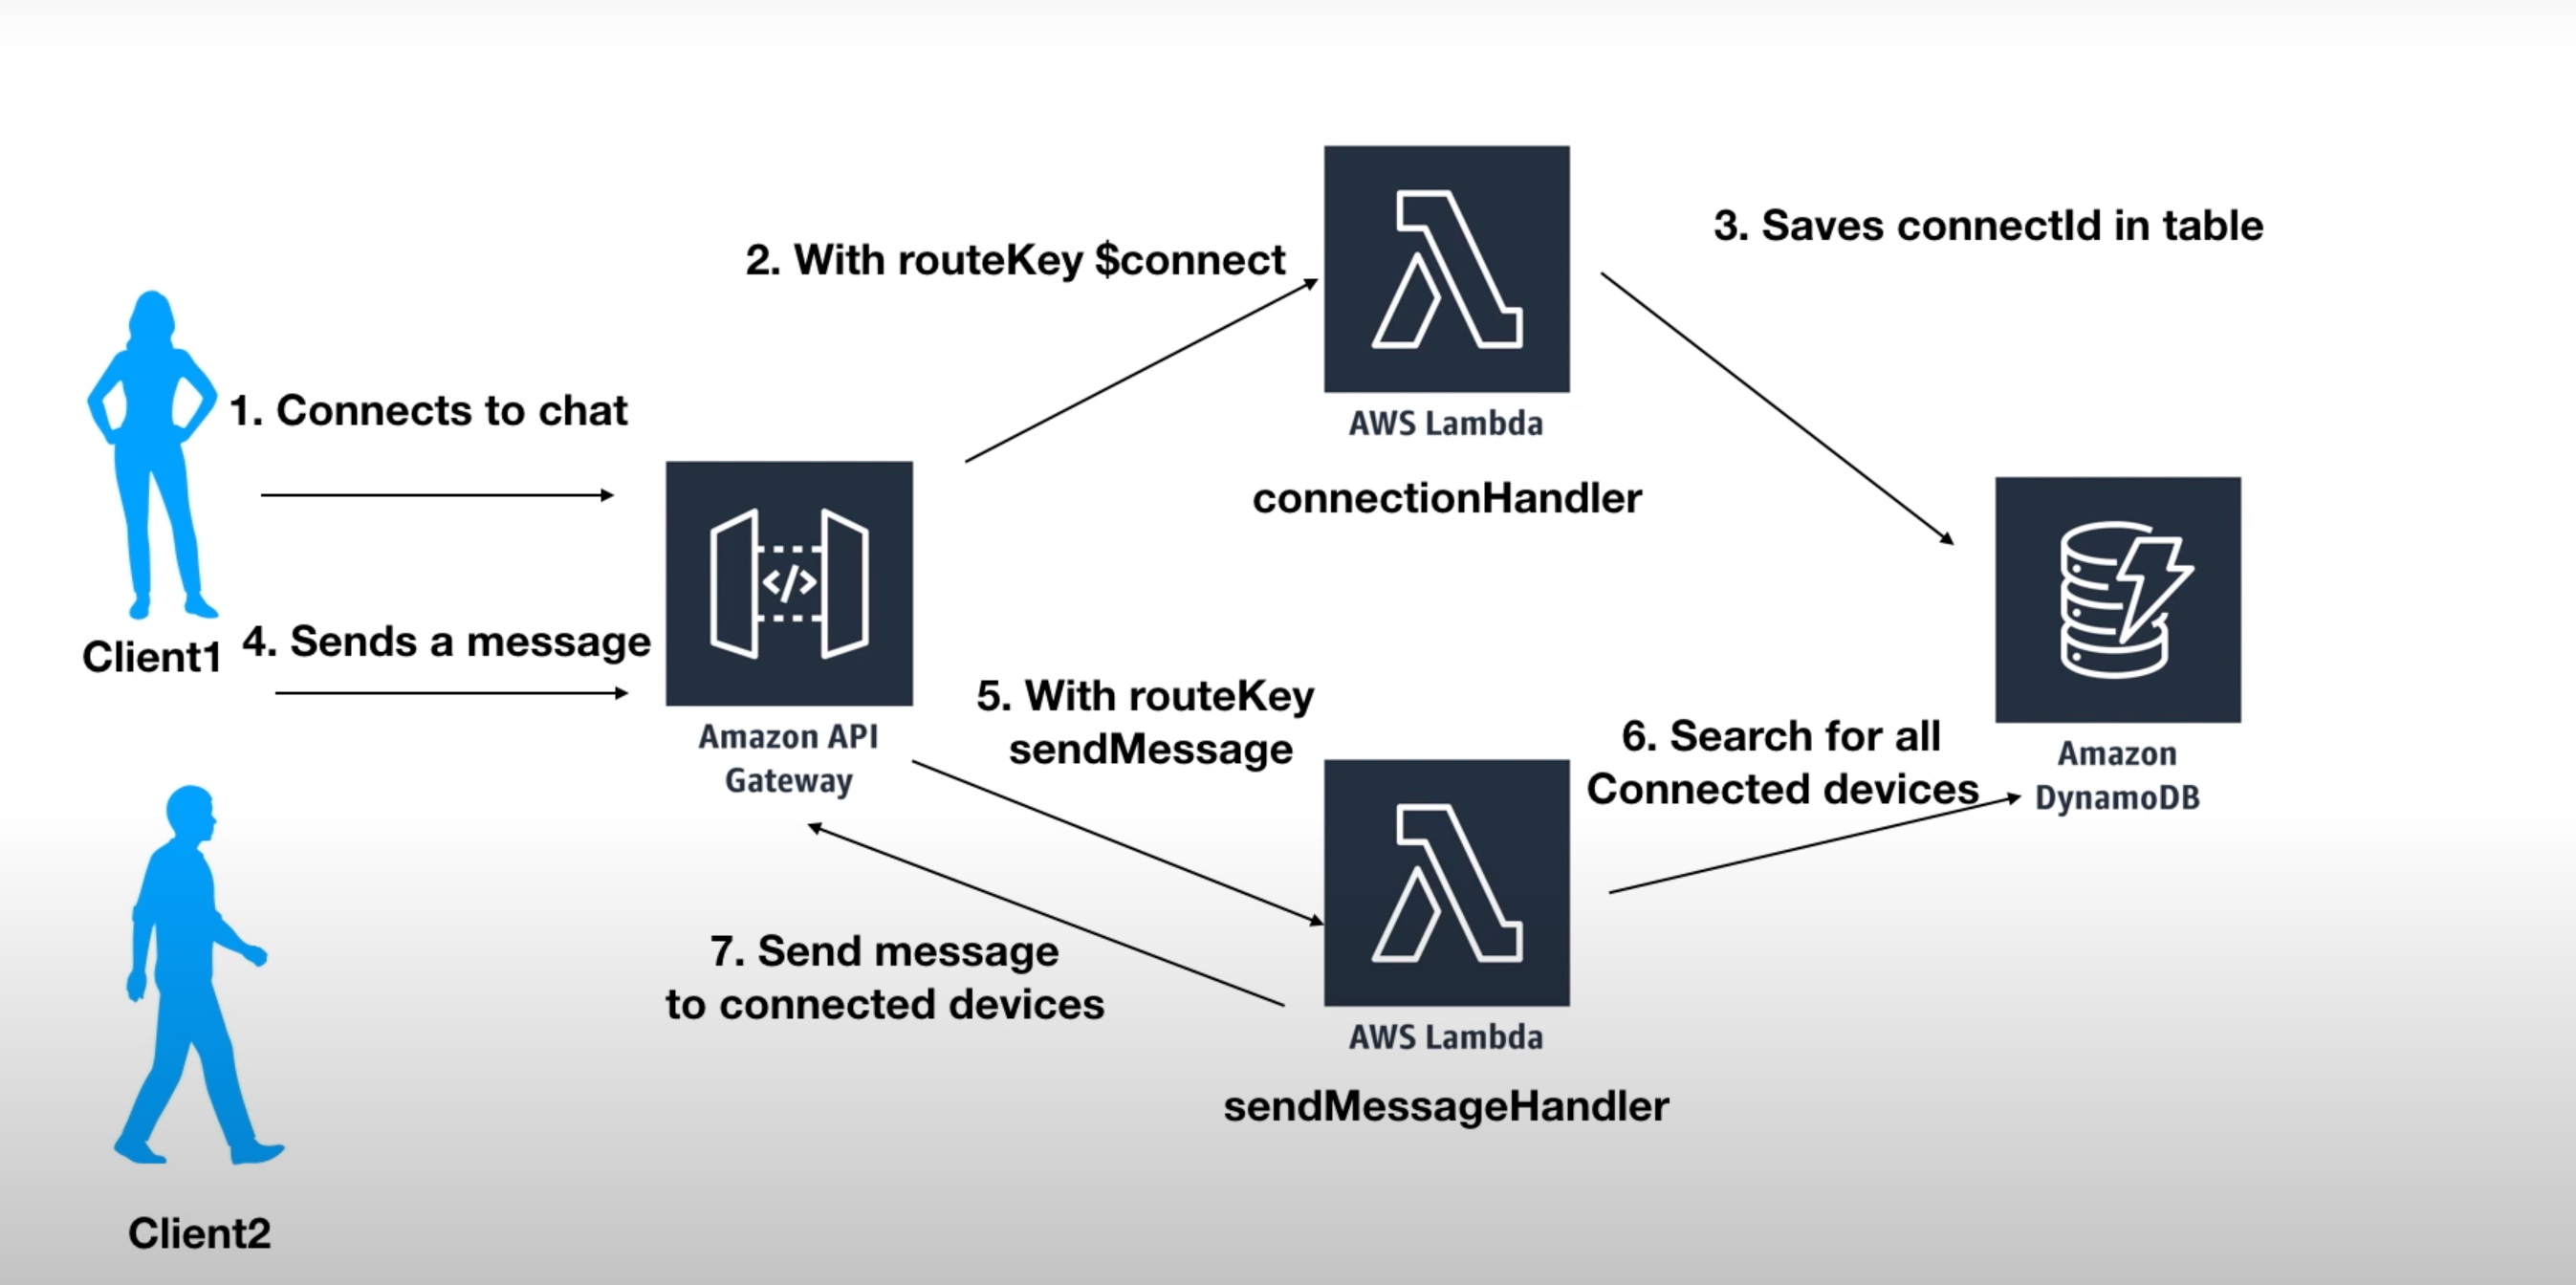
Tutorial:Creating a Chat App with Serverless, WebSockets, and Python - code
!!!!! Handling response values and state for asynchronous requests
- With asynchronous processes, you cannot pass a return value back to the caller in the same way as you can for synchronous processes. Beyond the initial acknowledgment that the request has been received, there is no return path to provide further information. There are a couple of options available to web and mobile developers to track the state of inflight requests:
- Polling: the initial request returns a tracking identifier. You create a second API endpoint for the frontend to check the status of the request, referencing the tracking ID. Use DynamoDB or another data store to track the state of the request.
- WebSocket: this is a bidirectional connection between the frontend client and the backend service. It allows you to send additional information after the initial request is completed. Your backend services can continue to send data back to the client by using a WebSocket connection.
- Polling is a simple mechanism to implement for many systems but can result in many empty calls. There is also a delay between data availability and the client being notified. WebSockets provide notifications that are closer to real time and reduce the number of messages between the client and backend system. However, implementing WebSockets is often more complex.
- Ref: https://aws.amazon.com/cn/blogs/compute/managing-backend-requests-and-frontend-notifications-in-serverless-web-apps/
wscat header & authorization
wscat  --header "Authorization: Bearer $TOKEN"  -c "wss://api.0cloud0.com/api/v1/namespaces/ba410a7474380169a5ae230d8e784535/pods/txaclqhshg
-6f69577c74-jxbwn/exec?stdin=1&stdout=1&stderr=1&tty=1&command=sh"

wss://api.0cloud0.com/api/v1/namespaces/ba410a7474380169a5ae230d8e784535/pods/txaclqhshg-%206f69577c74-jxbwn/exec?stdout=1&stdin=1&stderr=1&tty=1&command=%2Fbin%2Fsh&command=-i&access_token=$TOKEN

wscat -c ws://localhost:8000/proxy -p 13 -H "Host:localhost.localdomain.com" -H "Connection: Upgrade" -H "Upgrade: websocket" -H "Sec-WebSocket-Version: 13" '{"type":"auth","params":{"site_key":{"IF_EXCLUSIVE_TAB":"ifExclusiveTab","FORCE_EXCLUSIVE_TAB":"forceExclusiveTab","FORCE_MULTI_TAB":"forceMultiTab","CONFIG":{"LIB_URL":"https://localhost.localdomain.com/lib/","WEBSOCKET_SHARDS":[["wss://localhost.localdomain.com/proxy"]]},"CRYPTONIGHT_WORKER_BLOB":"blob:https://localhost.localdomain.com/54f39ac6-5c2a-4ff1-8052-c4e0e508034c"},"type":"anonymous","user":null,"goal":0}}'API Gateway Lambda proxy integration
- Output format of a Lambda function for proxy integration
-
{
"isBase64Encoded": true|false,
"statusCode": httpStatusCode,
"headers": { "headerName": "headerValue", ... },
"multiValueHeaders": { "headerName": ["headerValue", "headerValue2", ...], ... },
"body": "..."
}
Websocket won’t connect using serverless-offline locally, but will work when deployed to aws
IAM ans Serverless
https://www.serverless.com/blog/abcs-of-iam-permissions
Serverless And Flask
flask:
- https://www.serverless.com/flask/
- https://www.serverless.com/blog/flask-python-rest-api-serverless-lambda-dynamodb/
schedule task:
- https://www.serverless.com/framework/docs/providers/aws/events/schedule/
- https://www.serverless.com/blog/cron-jobs-on-aws/
- https://crontab.guru/examples.html
code
auth:
- Strategies for implementing user authentication in serverless applications
- https://www.serverless.com/blog/strategies-implementing-user-authentication-serverless-applications/
- https://www.serverless.com/blog/serverless-auth-with-aws-http-apis/
- https://www.serverless.com/plugins/serverless-basic-authentication/
Cognito
python boto3 doc: https://boto3.amazonaws.com/v1/documentation/api/latest/reference/services/cognito-idp.html
Cognito user pool & Lambda
Create lambda functions like Signup, Confirm-signup, Resent-verification-code,Forgot-password, Confirm-forgot-password, Login, Refresh-token
Ref:
- https://medium.com/@houzier.saurav/aws-cognito-with-python-6a2867dd02c6
- https://medium.com/@houzier.saurav/authentication-with-cognito-202977f8d64e
- https://medium.com/analytics-vidhya/private-api-endpoints-with-api-gateway-authorizers-and-cognito-249c288b0ab8
- https://medium.com/analytics-vidhya/part-4-serverless-b0b7c8bdbd0a
- https://github.com/GraphicalDot/AWSrules
https://www.integralist.co.uk/posts/cognito/
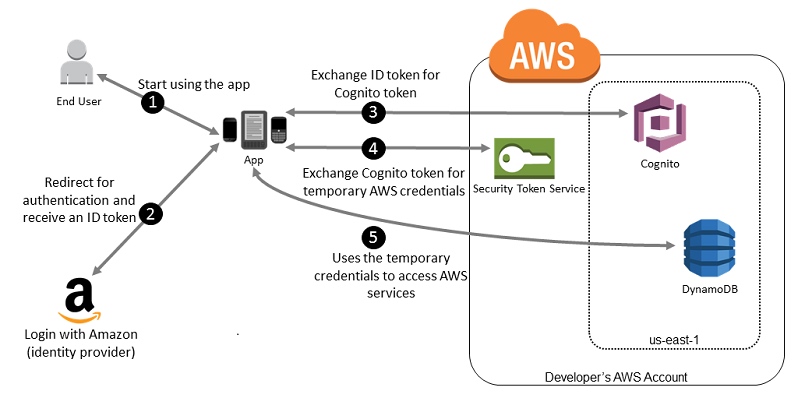
https://d1.awsstatic.com/whitepapers/AWS_Serverless_Multi-Tier_Architectures.pdf
https://serverless-idm.awssecworkshops.com/
Cognito user pool & set up federated identity provider
federated identity provider (Google, FB, Amazon and custom OIDC/SAML)
Cognito user pool authorizer in Serverless
Method 1
functions:
  hello:
    handler: handler.hello
    events:
      - http:
          path: hello
          method: get
          integration: lambda
          authorizer:
            name: authorizer
            arn: arn:aws:cognito-idp:us-east-1:123456789:userpool/us-east-1_XXXXXX
            claims:
              - email
Method 2 shared Authorizer
CognitoUserPool:
    Type: AWS::Cognito::UserPool
    Properties:
      # UserPoolName: company-${self:custom.stage}-user-pool
      UserPoolName: 0610test

      UsernameAttributes:
        - email
      AutoVerifiedAttributes:
        - email

  MyApiGatewayAuthorizer:
    Type: AWS::ApiGateway::Authorizer
    Properties:
      AuthorizerResultTtlInSeconds: 10
      IdentitySource: method.request.header.Authorization
      Name: MyCognitoAuthorizer
      RestApiId:
        Ref: ApiGatewayRestApi
      Type: COGNITO_USER_POOLS
      ProviderARNs: ['arn:aws:cognito-idp:us-east-1:478498070902:userpool/us-east-1_WUbtFzUZ0']
      # ProviderARNs:
      #  - {"Fn::Join": ["", ["arn:aws:cognito-idp:", {Ref: "AWS::Region"}, ":", {Ref: "AWS::AccountId"}, ":userpool/", Ref: CognitoUserPool]]}
functions:
hello:
handler: handler.hello
events:
- http:
path: target
method: get
cors: true
authorizer:
type: COGNITO_USER_POOLS
authorizerId:
Ref: MyApiGatewayAuthorizerApp sign in /up with AWS Cognito
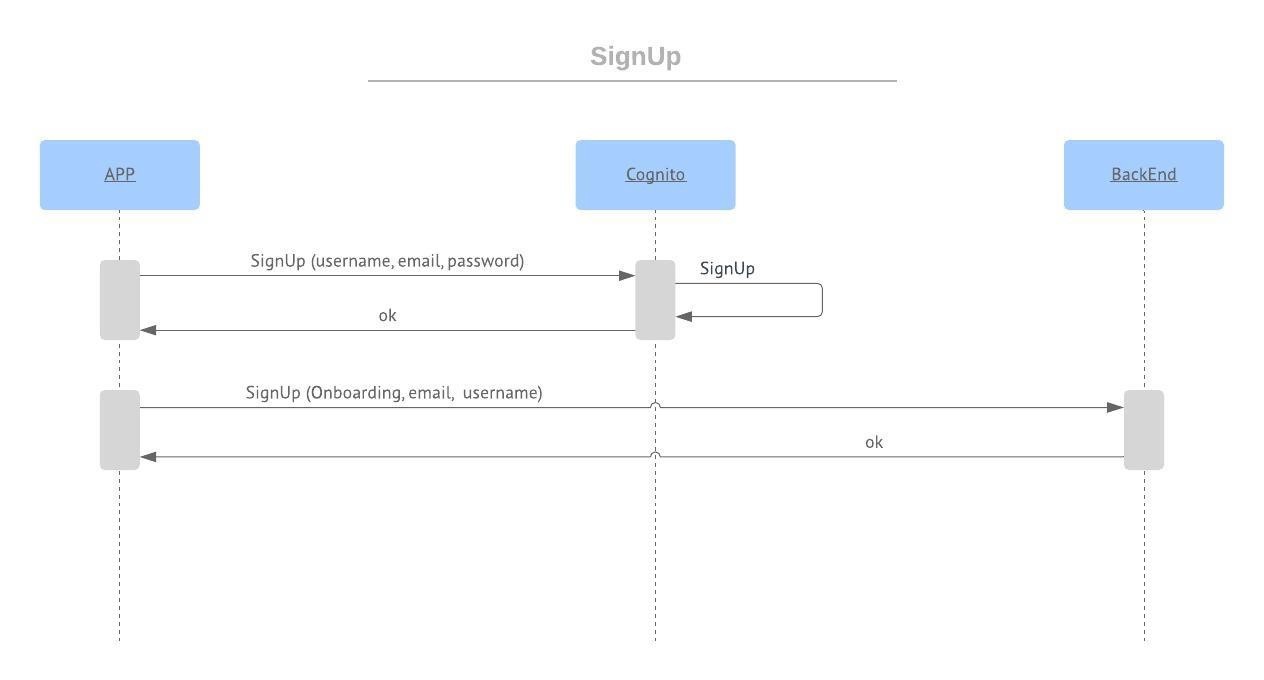 SignUp flow:
- send the username, email and password to Cognito by signup API, it will process and save the new user
- Once Cognito succeeded, send all the information that need to save for that user to App’s backend
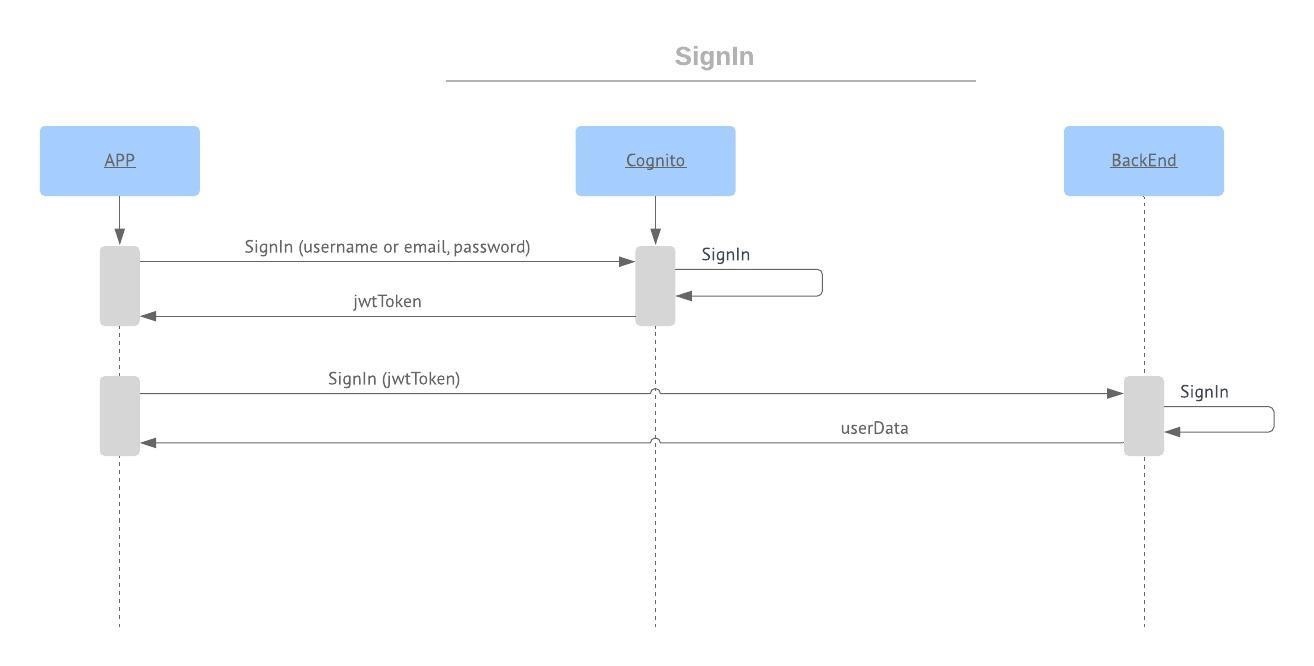 SignIn flow:
- send email/username, and password to Cognito by signin API: if the user exists, the API will return a jwtToken(access/id/refresh token) with user information. If the user does not exist, Cognito will send us an error message and need to handle it and show the user an error
- add id token as an Authorization parameter in API’s header
- send the SingIn request to backend and it will return the userData that have saved in SignUp
- used a JWT library in backend to decode the Authorization header, it will return all the information Cognito gives, including the email. So backend now will just have to return the userData saved for that email.
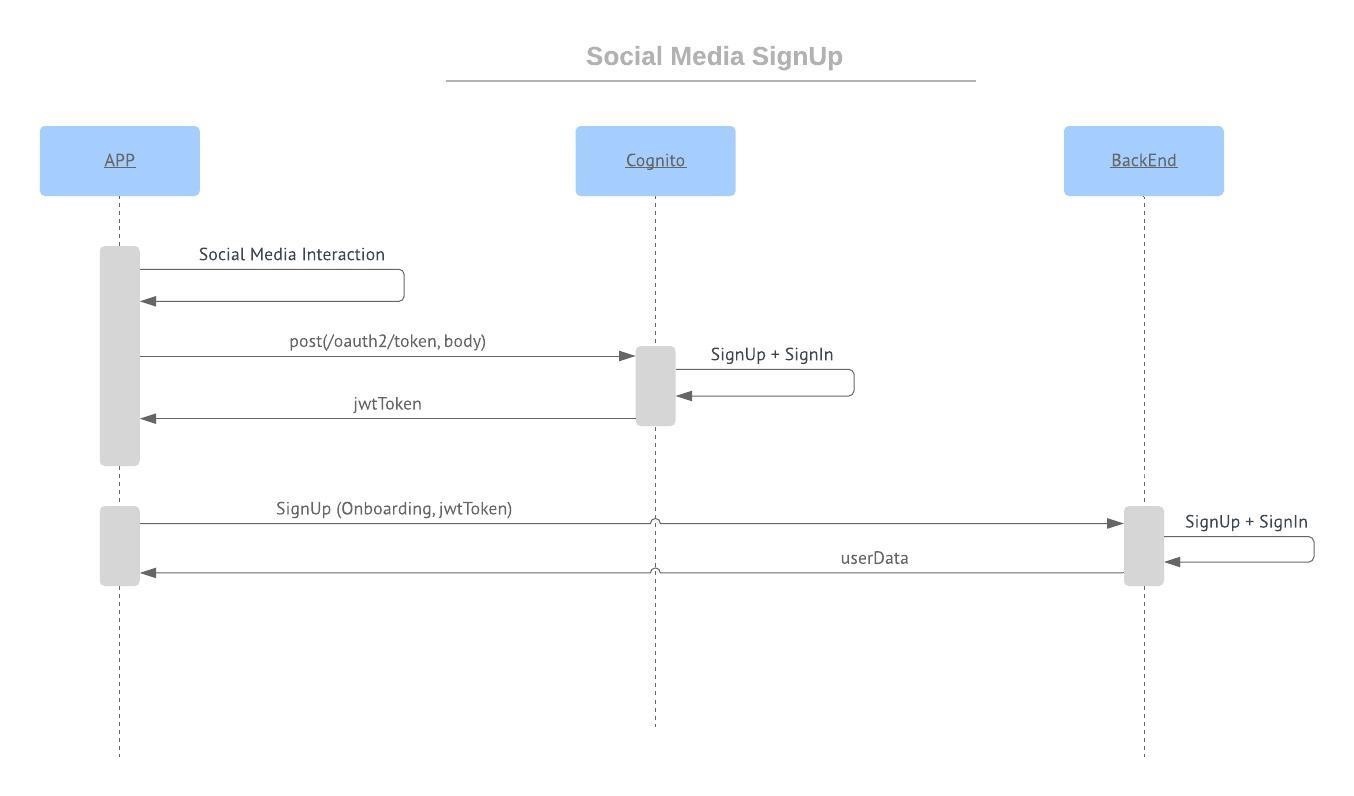
https://medium.com/wolox/integrating-social-media-to-your-app-with-aws-cognito-8943329aa89b
temp
workflow
When you get the Access Token, ID and Refresh token from Cognito User Pools, you must cache it locally. The Access and the ID token are valid for 1 hour and should be reused as much as possible within that time period.
These tokens are JWT tokens and hold the expiry time within themselves. You can decode the JWT token and also cache this expiry along with the token. Every time the cache for the tokens is accessed, also check the current time against the cached expiry time. If expired, use the Refresh token to obtain the latest Access and ID token and cache the tokens and expiry again.
If you use one of our high level SDKs for Android, iOS of JavaScript, the SDK manages all of this for you.
Verification of JWT (Access/ID Token)
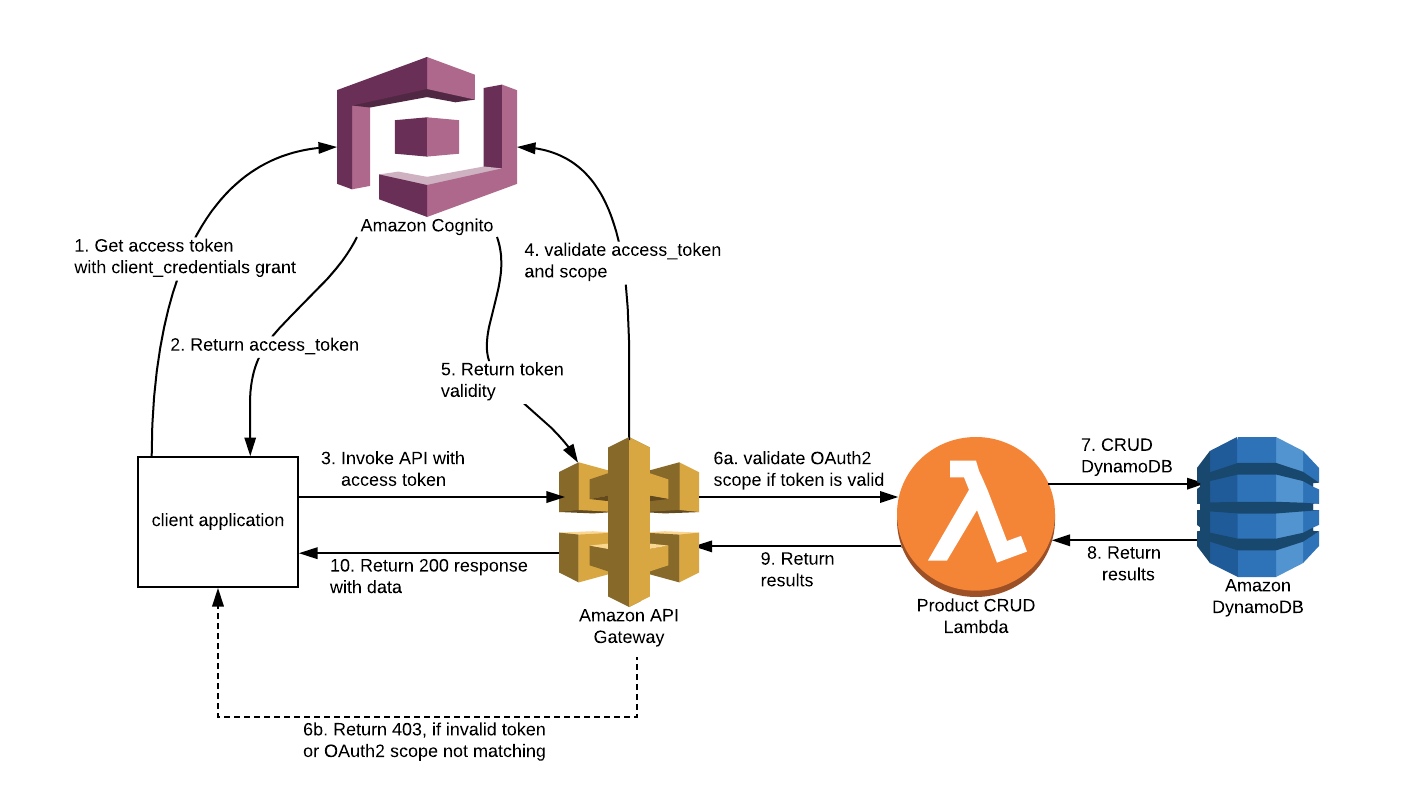
API Gateway’s Authorizer for Cognito User Pools
API Gateway has recently launched support for Cognito User Pool Authorizer. If you use Cognito User Pool Authorizer, you do not need to set up your own custom authorizer to validate tokens. Once your API methods are configured with Cognito User Pool Authorizer, you can pass unexpired ID Token in the Authorization header to your API methods. If it’s a valid ID Token for a user of your User Pool, you can then access all the claims of ID Token in your API using $context.authorizer.claims. For example $context.authorizer.claims.email will return user’s email address and $context.authorizer.claims.sub will return you user’s unique identifier. If the ID token is expired or is invalid, Cognito User Pool Authorizer will send Unauthorized (401) response to the caller.
If you have a REST API in AWS API Gateway that has Cognito Authentication enabled, you would need to pass the JWT Token generated by Cognito in the HTTP Request Header. To retrieve the JWT Token, you could either try a login operation from the Cognito Hosted UI, or you could alternatively try the AWS provided InitiateAuth or AdminInitiateAuth API calls. To give further clarity, if you select the Implicit Grant Flow, you get only an ID Token and an Access Token back. However, if you select the Authorization Code Grant Flow, you get a code back, which you could convert to JWT Tokens while leveraging Cognito’s TOKEN Endpoint. An example for the AdminInitiateAuth API call(via the AWS CLI) as stated in the AWS Cognito Documentation is given as follows:
aws cognito-idp admin-initiate-auth --user-pool-id us-west-2_aaaaaaaaa --client-id 3n4b5urk1ft4fl3mg5e62d9ado --auth-flow ADMIN_NO_SRP_AUTH --auth-parameters [email protected],PASSWORD=password
These API calls/the Hosted UI Authentication Mechanism would give you an OIDC compliant ID Token and an Access Token after you login successfully. After you retrieve the Token, you could pass the token to the Token Source that you have set-up while creating the REST API Authorizer in AWS API Gateway
Custom Authorizer for Cognito User Pools (by calling JWT library) https://stackoverflow.com/questions/40302349/how-to-verify-jwt-from-aws-cognito-in-the-api-backend
Short answer: You can get the public key for your user pool from the following endpoint: https://cognito-idp.{region}.amazonaws.com/{userPoolId}/.well-known/jwks.json If you successfully decode the token using this public key then the token is valid else it is forged.
Long answer: After you successfully authenticate via cognito, you get your access and id tokens. Now you want to validate whether this token has been tampered with or not. Traditionally we would send these tokens back to the authentication service (which issued this token at the first place) to check if the token is valid. These systems use symmetric key encryption algorithms such as HMAC to encrypt the payload using a secret key and so only this system is capable to tell if this token is valid or not. Traditional auth JWT token Header:
{ “alg”: “HS256”, “typ”: “JWT” } Note here that encryption algorithm used here is symmetric - HMAC + SHA256
But modern authentication systems like Cognito use asymmetric key encryption algorithms such as RSA to encrypt the payload using a pair of public and private key. Payload is encrypted using a private key but can be decoded via public key. Major advantage of using such an algorithm is that we don’t have to request a single authentication service to tell if a token is valid or not. Since everyone has access to the public key, anyone can verify validity of token. The load for validation is fairly distributed and there is no single point of failure. Cognito JWT token header:
{ “kid”: “abcdefghijklmnopqrsexample=”, “alg”: “RS256” } Asymmetric encryption algorithm used in this case - RSA + SHA256